Hello everyone!
I hope you all are having an excellent day! I am finally getting around to this bonnet tutorial that I promised forever ago. =]
Here is the bonnet...

I made this bonnet last year on Tasha Tudor Day (one of my favorite holidays) on which I get to revel in all things creative and homey! (Mabel rolls her eyes at my enthusiasm.) =] I was sad to miss sharing it with all of you this year. I was camping with my family at the beach!

This is my first tutorial so please bear with me. If I leave anything out or you have any questions please comment!
First of all...
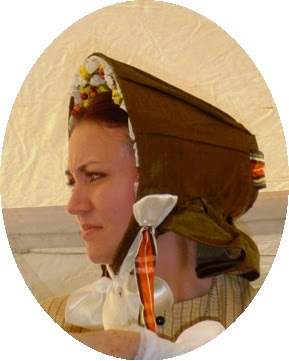
I wanted to make an 1860's bonnet kind of like these two below:
I found these images on this fabulous website:
http://www.victorianbonnets.com/index.htm
This one is a reproduction that they made. Isn't it lovely?

This one is an original 1840's Coal Scuttle bonnet

My bonnet however turned out to be more of an 1850's style but could work for 1840's-1860's.


Here is the pattern that you may save to your computer and print for your own (non-commercial) use. To make sure it's printing the correct size (the original size) measure the strait side-edge of the brim. It should be about 2 1/4".
Fit's up to a 9" around head (circumference around widest part).
Materials:
(measurements are approximate)
Outer fabric: I used linen. You could also use silk,
cotton, taffeta, brocade, pretty much anything!
You will need: 120 sq. in. (about 11 x 11 in. square)
NOTE: You will want extra if you plan to trim the bonnet with the same fabric.
For the inside support of the bonnet: I used buckram.
You could also use a very light straw, heavy interfacing or plastic canvas.
You will need: 42 1/4 sq. in. (6 1/2 x 6 1/2 in. square)
NOTE: I suggest when you cut out the paper pattern that you try it on your doll's head just to make sure it's the right size. If it doesn't look quite right you can try resizing it on your computer. Or if you are an artist you can always just use my pattern as a guide for shape, if you like, and draw the size you need.
Miss Emaline's 1840's-1860's Bonnet
1.Pin pattern pieces 1 & 2 that say '(Buckram Support)' onto buckram and cut. Don't forget to cut notches out so it will curve nicely.

2. This part is easier if you don't pin it. Start sewing the notched edge of buckram crown to the
short curved edge of brim using a whip stitch. It should look like this when done. (I also had to trim a little bit off the bottom of the crown to make it line up with the bottom sides of the brim.)
(The inside looks like this)

(The outside, like this)


3. Pin and cut out outer fabric pieces (pieces 3 & 4). There should be 2 of each piece. One set for the outside, one set for the lining.
IMPORTANT: Do NOT cut out notches on the crown fabric until you have sewn the seam!
4. In order for the fabric to fit over the buckram just so, the seams have to be perfect. Center and pin the buckram 'brim' pattern piece to the wrong side of the fabric you just cut and trace around with a pencil. This way you'll have a perfect line to sew the seam on. Do the same with the crown pieces (marking the notches but not cutting them).

(And don't pay attention to what the patterns have written on them or how they're cut in the pictures. Those were the very first pattern pieces which I had to change to make it easier to do.) =]

5. Pin your brim pieces right sides together, then start sewing at one side of the short curved edge all the way around the brim, stopping at the other side of the short curved edge so you can turn it later. Remember to sew right on the line you drew to ensure a good fit.
After you sew this seam you'll want to try it on your buckram bonnet to make sure it fits. You should have about a 1/4" of fabric that sticks out past the crown in the back. This is seam allowance for the crown fabric.

6. Once you're sure it fits, trim the seams to about an 1/8". Trim corners also, making sure you don't cut off any stitching. Turn right side out and press. OPTIONAL: If you like you can put fray check on the edge to stop fraying.
7. This is the tricky part. With 1 brim piece and 1 crown piece, pin right sides together and sew the (marked) notched edge of your crown fabric to the short curved edge of your brim fabric. This will create the outside of your bonnet. It should look something like this.
NOTE: try it on your buckram at this point to fit.

Repeat with your other crown piece to the other brim piece (to create the lining) leaving the short strait edge unsewn. At this point you should have all the fabric pieces sewn together. It should look like this.

(Don't forget to try it on your buckram to make sure it still fits! I had to roll the buckram up a little to get it in the opening.)

8. Now that you're sure it all fits how you want it, take it off the buckram and cut the notches on the crown pieces, but not quite all the way to the seam or it will fray. Turn right side out again, press and insert buckram.

9. Press again once the buckram is in.

10. Tuck in your seam allowance and sew up the opening with a blind stitch to finish.

And there you have your finished bonnet!


Now the fun begins! You may decorate it anyway you wish.
With mine I gathered a ribbon up in three places then sewed it on to the bonnet with just a few stitches (So I could change it easily).


And Voila! Here it is!

You have to keep in mind though, that the nature of bonnets is that they tend to fall backwards off the head. And when you are made of fine china it is extra slippery. Luckily, there are tricks to keep it in place. Since hat pins are out of the question for me, I use simply a little bit of scotch tape (Ssh! Don't tell!) on the inside of the crown and it keeps it up beautifully!
Also, a friend of mine came up with the very clever idea of stretching a rubber band around the head a couple times and placing the bonnet over that and it will stick to the rubber. Quite brilliant! If anyone else has any ideas I would love to hear them!


It also fits on a quite smaller head.


Very "Dickensonian" don't you think?
So there we are. I dearly hope this isn't too confusing. It is a simple thing to make but my directions always turn out more confusing than they should be. So don't PANIC! =]
In my next post I'll put pictures of the decorated bonnet!
Thank you so much for reading! If you use the tutorial, please let me know how it is and if it worked!
All my love,
Marguerite (Emaline)


 This one is an original 1840's Coal Scuttle bonnet
 My bonnet however turned out to be more of an 1850's style but could work for 1840's-1860's.


 3. Pin and cut out outer fabric pieces (pieces 3 & 4). There should be 2 of each piece. One set for the outside, one set for the lining.
 (And don't pay attention to what the patterns have written on them or how they're cut in the pictures. Those were the very first pattern pieces which I had to change to make it easier to do.) =]
 6. Once you're sure it fits, trim the seams to about an 1/8". Trim corners also, making sure you don't cut off any stitching. Turn right side out and press. OPTIONAL: If you like you can put fray check on the edge to stop fraying.
 (Don't forget to try it on your buckram to make sure it still fits! I had to roll the buckram up a little to get it in the opening.)
 8. Now that you're sure it all fits how you want it, take it off the buckram and cut the notches on the crown pieces, but not quite all the way to the seam or it will fray. Turn right side out again, press and insert buckram.


 You have to keep in mind though, that the nature of bonnets is that they tend to fall backwards off the head. And when you are made of fine china it is extra slippery. Luckily, there are tricks to keep it in place. Since hat pins are out of the question for me, I use simply a little bit of scotch tape (Ssh! Don't tell!) on the inside of the crown and it keeps it up beautifully!


